Monday, October 6, 2014

DIY Wedding

Mike stitching the programs next to my "serger station."
We made almost everything for the wedding: invitations, my dress, tablecloth and napkins, drapes for the stone pillars of the pavilion, hand-carved stamps to decorate flower pot guest favors, aprons for the kiddos to cover their clothes while painting pumpkins, and ceremony programs.

Three weeks before the wedding we spent a glorious August Sunday in bed writing the ceremony, blubbering in turns over the passages we chose to represent our union.


We printed the program on thicker paper, choosing a picture my nephew took of us on a hike, and included all of the ceremony readings for guests to follow along. One of Mike's sisters got ordained online and performed the ceremony. Internet win.


Mike hand-stitched the program binding. The book arts nerd in me did somersaults when I saw the lovely stitch pattern he came up with.


Two weeks before the wedding we stopped working on the house and switched our efforts to turning the materials we'd been collecting for months into the beautiful outdoor wedding of our dreams. Days upon days of sitting side by side, stitching, carving, fitting, and talking about how wonderful it was going to be.

For the tablecloths, pillar drapes and napkins we used a 50% off coupon at Joann fabrics and bought 14 yards of white cotton muslin.

We cut the fabric into the sizes we needed and then dyed the muslin green using RIT liquid dye and the washing machine method.

Then I serged all the edges with a complimentary green and that was that. The drapes are tied with a burlap sash.

Our ceremony included an "elemental blessing" with water, a candle for fire, a bell for air and bread for earth.

We purchased two cases of 12 oz ball jars for holding candles (with a couple inches of sand from the beach of the lake to keep them in place) and drinking glasses.  Guess who already has next year's canning supplies!

Group reading during ceremony


The morning of the wedding we decorated the lovely stone pillared pavilion with our crafts, listening to music and dancing as we did, and then we separated to get ready. Mike's oldest sister arrived and set up the cake she'd made for us, then his parents and aunt and uncle trickled in and set up the food they'd brought.


We had planned to make a menu of vegetarian foodie delights but a month before the big day some picky eaters who will remain nameless asked for ziti, which would not have gone with anything. We realized we didn't really care what people ate as long as they were happy with what they ate, so we let Mike's parents take over the menu and we ended up with a delicious Italian feast.


Throughout the planning phase it was clear that many people we discussed the wedding with assumed we were choosing a small, outdoor wedding for financial reasons. This irritates me to no end.


Could we afford a $10,000 wedding? Not without going into debt. But we wouldn't want that big, expensive wedding even if we had the cash. We tend towards the introverted, so a crowd would have been overwhelming (frankly I was a bit exhausted with the small party). We're also really private people and spoke extensively over the year before the wedding about how we wanted our wedding to be an intimate exchange of vows, shared only with the people closest to us. And that's what we got.

Our wedding was perfect for us and perfectly us. As terribly cliche as it sounds, it was the happiest day of my life and I wouldn't change a thing.

Thursday, July 10, 2014

Tips for designing a small house

Researching sustainable building and small house design can be overwhelming. I have about a dozen notebooks full of floor plans and house drawings I've been scribbling out for over a decade. I was 18 when I picked up my first book on passive solar home design and caught the "I want to build my own house bug," but I wouldn't have the skills, knowledge or ability to do so until my late 20's. In that time I read and researched home design and here are what I consider must-haves for small home design:

Phase building: we'll add a bedroom "wing" on this side
of the house (southern) that will start at the middle
bent and extend to the back of the house

  • Southern Exposure: Orient your structure so that southern exposure is given to one of your two long walls (in the northern hemisphere) to maximize sunlight and warmth in your home in the winter.

  • Eaves: Ample eaves are an important tool of passive solar design, they provide shade from the higher-in-the-sky summer sun but let in light from the sun's lower winter route.
  • Close off the North: Northern walls should have as few openings as possible because they will leak the most heat.
  • Streamline plumbing: If you can design bathroom and kitchen plumbing to share a wall you will save in plumbing supply cost. I was not able to do this in the end but it's still a good tip.
  • Design for building in phases: Our current house is 12x20 but we "built" into the design the entrances to additions we will build on either side of the structure in the future. Avoid running plumbing and electric through these planned entrances.
    Phase building: the window on the right will become
    an entryway for the southern addition 
  • Timber framing is especially suited for building in phases because the wall studs can be removed to make an entryway to an addition without impacting the structural integrity provided by the large timber frame bents.
  • Size your insulation: Pay attention to recommended r-values in your area and understand that this will impact how wide your roof rafters and walls should be. In our part of upstate NY R-40 is required in the roof if heating with non-renewable sources. Depending on how you achieve R-40 (rolled insulation, foam board, a combination of the two) you may need to use 10-12" wide roof rafters.
  • You can't have everything: Pay attention to how you live and prioritize space requirements. I spent a lot of energy trying to fit a kitchen, living/sitting room, bathroom and staircase into the first floor. And then we spent a year living in a 9x13 room and realized that we don't need a living room as much as we need a full kitchen and bathroom. So we've got a living room addition planned for down the road.
  • Electric: Knowing how to run an electrical circuit so everything operates normally and knowing how to run an electrical circuit according to code are not the same thing. The code has things such as tamper-resistant GFCI's being required in kitchens but not places more in reach of children. Or the fact that you can't have the kitchen lights on the same circuit as the kitchen appliances. Do some research and you'll be fine.
The Visual Handbook of Building and Remodeling, by Charlie G. Wing, is an excellent resource for all of the above information and more.

Tuesday, June 10, 2014

Timber Frame Construction


We designed our house using Timber Frame Construction: All About Post-and-Beam Building, by Jack Sobon and Roger Schroeder. This book is an excellent resource for the diy timber frame builder so much so that I would say if you only buy one book this should be it.

The authors cover the basics of history, structural type, joinery, and wood and tool selection in easy to follow descriptions that gave us the confidence to build a timber frame home.

Mike adapted the plans for the 12x16 garden tool shed included in the book to a 12x20 structure for our home. We could have built 12x24 without needing to alter the joinery but at the time we didn't like the aesthetics of that size.  In retrospect we would definitely give ourselves the extra four feet if for nothing other than a real staircase, which takes up so much floor space it is the bane of tiny housers the world over.

plans for a 12x16 garden tool shed included in book

One big way to save money for the diy builder is in the house plans.  Our local building code doesn't require an engineer or architect stamp on building plans under 1500 square feet, saving anywhere from a few hundred to a few thousand dollars depending on local rates and how much design time is needed.

The authors give clear instructions for modifying the tool shed design, so there was no guessing on our part as to whether we would need to adjust joinery or timber size to build a larger structure.


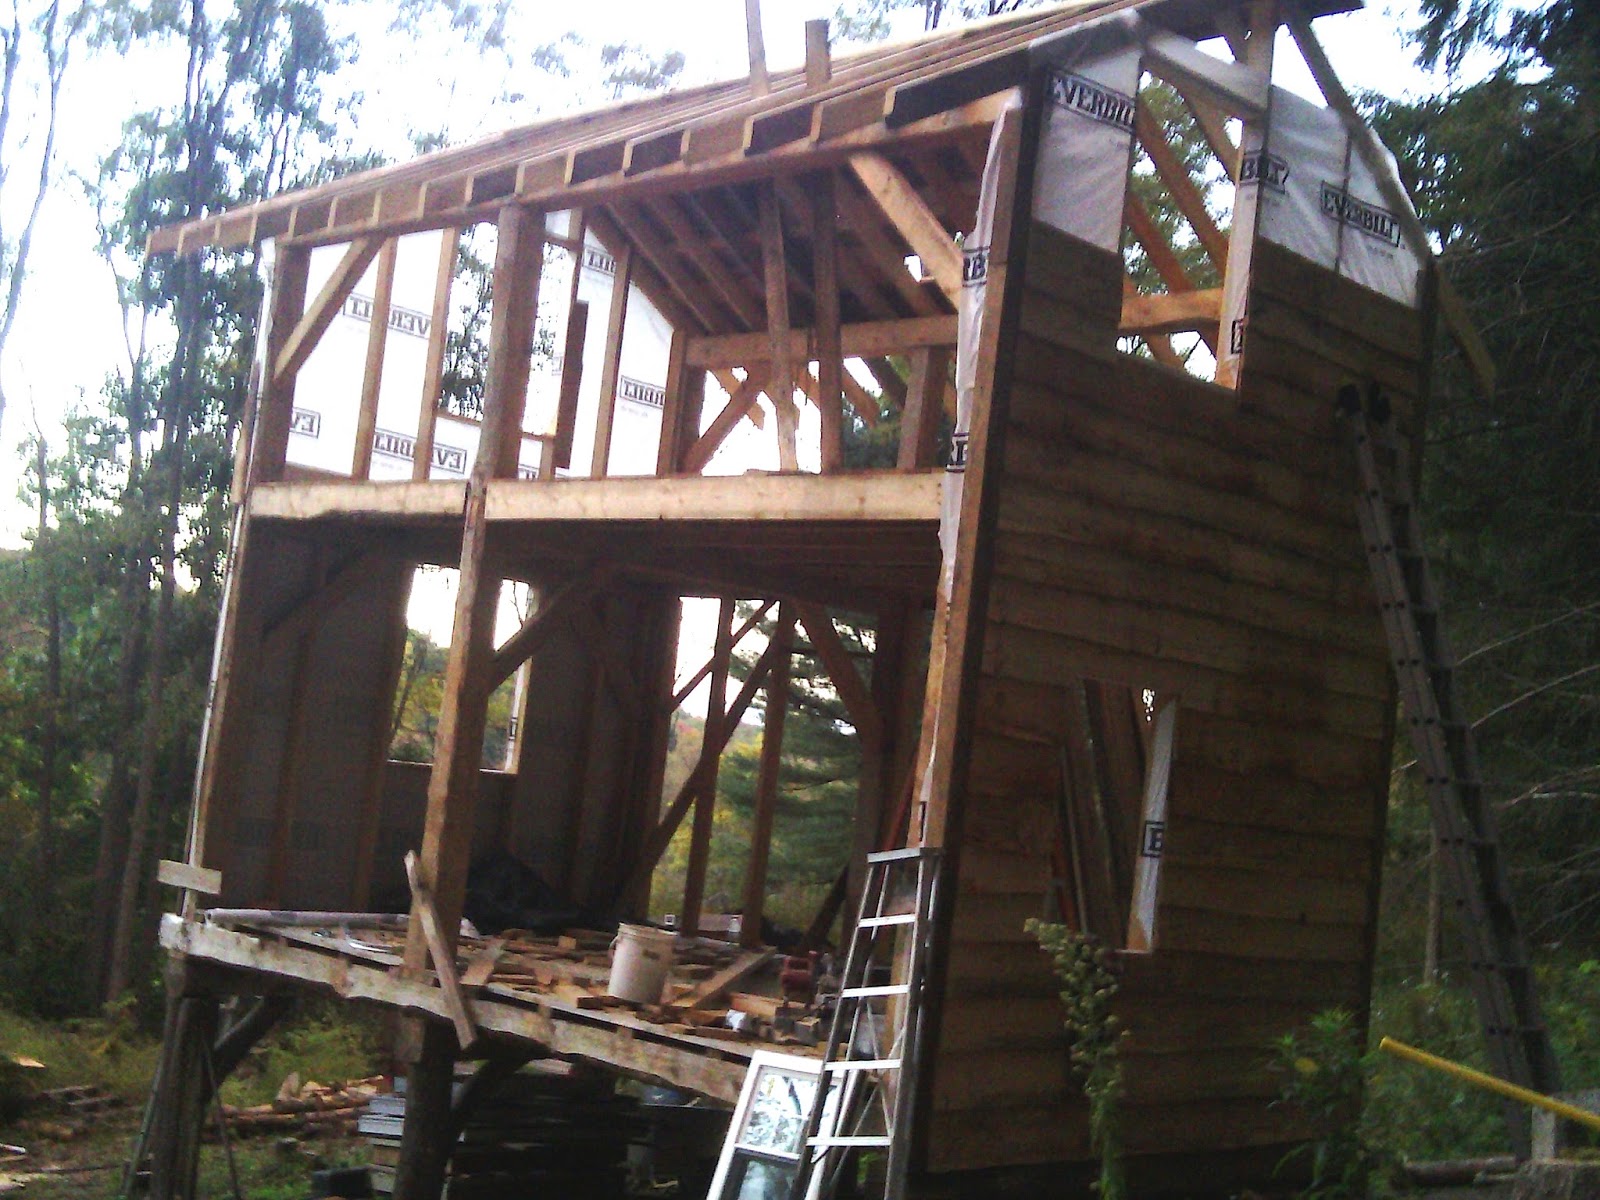
These are the bones of our house. I could look at these pictures all day long.

We lengthened the eaves for summer shade and winter light and to keep water as far away from our piers as possible.

We also added almost a full second floor; the side walls of the second story are five feet high but thanks to a 7/12 roof pitch the ceiling rises quickly enough that we don't lose any head space upstairs.


We changed some of the joints on the advice of our timber framing code officer. The rafters, for example, are notched with a birds mouth and then timber locked (heavy duty, kind of pricey "screws" that we also used to lock in the floor joists) in place.  The top plate (horizontal beam on which the rafters sit) are not notched, unlike in the book plans. This saved us some work and we're happy with the result.

So we got some outside help and didn't rely entirely on this book. And we modified the plans a bit to suit our own needs, but the ease with which we did so is part of what makes the book such a great resource.

Buy it, you won't regret it.


Wednesday, May 14, 2014

$450 Tiny House Foundation

There was never any question as to whether we would build our house on a basement or crawl space foundation.  As a mason, Mike had spent too much time patching and parging leaky, wet basements to even consider building on one (I've heard these words in this combination many, many times: "every basement has moisture problems"). The expense of a basement foundation for a couple of do-it-yourselfers on a budget would have eliminated it as an option anyway.

So the real question for us was: pier foundation or floating slab?

Floating slabs held a certain appeal for me because the foundation could serve as the floor of the first level of the house if we gave it a nice finish. Also, the idea of "floating" on top of the seasonal tides of freeze and thaw rather than fighting them made a kind of intuitive sense to me. 

future location of house and the trees we used to build it
Our land is on a slope, which would have meant a lot of excavation and then the back of the house would have been in the side of the hill: welcome back moisture problems.  And all that concrete and rock would have taken a hefty chunk of our building budget.

Our abundant black locust source meant we could build the house on "free" piers (with the amount of work we put into finding, felling, dragging, and joining 10-12" diameter locust piers I just can't bring myself to not qualify "free").

setting our intention/founding statement

For $300 we hired a fella to come up and drill out six pier holes 48" deep to get below frost level.

Then we poured a concrete footer.  We had planned to sink the piers in the concrete footer but our wonderful code officer, who owns a timber framing company and has been a wealth of information, recommended against it, explaining that water would move into the space between the concrete and the pier and start to rot the wood.  

So we poured the footer, dropped the piers in the holes and back filled with rocks and dirt.  

July 31, 2013: first pier bent completed


Ok, actually we made three sets of pier "bents" consisting of two vertical piers, a horizontal beam joined to the top and braces connecting the beam to the piers. 

This was extremely heavy, hard work, but the finished product was well-worth the effort.


September 2013: all three piers finished
Total foundation cost:

$300 for the holes
$150 for the concrete
$450 foundation

Benefits of piers:
     -probably the best method for a two person (three when Mike's dad came to help) build
     -ventilation means we won't have mold/mildew/rot problems
     -low carbon footprint due to very little concrete used
     -cheap, cheap, cheap when you diy  

For technical information about the foundation (sizing piers and footers, joinery) don't hesitate to email me: barrett.ec@gmail.com. Or better yet comment!
    

Monday, April 21, 2014

Quick and easy cold frame for seedlings

cold frame with cover crops hairy vetch and rye growing in the background
One of the benefits of raised garden beds is the ability to make this simple hoop house cold frame.

Tiny house living does not afford the space for growing seedlings indoors. We opted to germinate seeds 10-12 weeks before last frost using a space-saving (and money saving because we didn't have to buy potting soil) method Mike's dad taught us: sandwich seeds in moist paper towels and put the paper towels in ziplock bags. Keep the towels moist and wait for the seeds to germinate.

5x6' bed needed 7' of tubing for each hoop 

We then transferred the germinated seeds to the cold frame, which we made using 1/2 inch pex tubing we had left over from an apartment renovation ($2.98 for 10ft, $28.52 for 100ft at most box supply stores) and 4mil plastic sheeting.

Other hoop material ideas: flexible saplings or electrical conduit.


seedlings separated by twigs and "name tags" written on wood


Push each end of the pex tubing into the soil 6-8 inches. For extra stability we tied a thin branch across the hoops but I'm not sure it's necessary as the garden is well-sheltered from wind. Lay the plastic sheeting over the hoops and weigh down with rocks. VoilĂ , an easy hoop cold frame that keeps the seedlings warm and traps in moisture.

we'll use the cold frame to grow salad greens into late fall/early winter

Sunday, April 6, 2014

Autopsy of a rocket mass heater

Winter in tiny house was cold. We didn't put much effort into building tiny house because we only needed it for one winter and we were expecting the winters we've been having for most of the last decade: a few snow storms but mostly in the teens with just enough t-shirt weather to melt all but the plow-piles of dirty, gravel-filled snow. If we'd had that winter tiny house would have been swell.
The polar vortex of 2014

Mike trying out his new drawknife January 2012


Back in the early fall we were trying to decide between building a rocket stove mass heater and installing a cast iron wood stove. Spoiler alert: this post could also be titled "the winter of my epic failure,"as Mike didn't want to build the rocket stove but, for better or worse, I can be very persuasive.

January 2014
The rocket stove we installed kept us warm until outside temps dropped below 10 degrees, which, anyone in upstate NY during the polar vortex knows, was so often as to make one believe spring was never going to come. For much of the winter tiny house hovered around 45, which isn't so bad in the spring, but in your home, when outside chores are done in subzero temps, 45 degrees means going to bed cold and waking up cold. It means so many blankets that shifting their weight as you toss and turn in your sleep wakes you up, and the two dogs and cat you let sleep in bed to help everyone keep warm wake you up too and in the morning you're still tired. So that was our winter.

Great info on building rocket mass heaters is available all over the internet, so I'm not going to cover that. Rather, this is an account of our difficulties with the heater and some guesses as to what went wrong.


Dry run of the mass heater showed excellent draw.


Fire being drawn through the burn chamber.

Mixing the cob
Laying it out in tiny house

refractory mortar for high heat applications
Cobbing it together
I had pictures of the finished product on a cell phone that lost a fight with the dog's water bowl. Oh well, it pretty much looked like every other simple mass heater.

Autopsy report:
1. Getting started: For the first two months the stove started up quickly but it got progressively more difficult to get the wood to catch and stay lit.
            -this could have been an issue with wood wetness as we cut our own firewood from 6" diameter black locusts we felled two summers ago but didn't chop up until this fall/winter--might have been too wet?

2. Wood usage: Online you'll find countless reports of the mass heater's superior efficiency and subsequent decreased wood usage. We did not find this to be true. We used about half the wood as our neighbor's conventional wood stove and they heat a rather large home (around 2000 sqft). Also, other rocketeers report very little ash to clean out of their stove, by contrast we were removing roughly a full paint can a week.
            -again this could be a wet wood issue
         
smoke couldn't get around the build up
3. Smoking: By January (two and a half months into using the stove) we were getting heavy smoke back for the first half hour of trying to start the fire. It completely stopped working in the last week of March, smoke billowed into the house and we couldn't get a draw. We periodically cleaned it out and fed a shop vac hose through the pipes, which usually helped but in the end this is what we found:
charcoal and ash build up between barrel and heat riser

        -my understanding was that this much ash shouldn't have made it to this point (up through the heat riser and settling between the barrel and the riser), having been so efficiently dissapated in the heat of the burn chamber, which would suggest that our fire didn't get hot enough. However, I find this unlikely as the fire got so hot that within the first month the refractory mortar was crumbling apart.
        -we probably used more paper to start the fires than advisable, this may have caused an ash problem.
        -I'm not satisfied with either of these explanations.

4. Warmth: Rocketeers report warming their bottoms on mass heater benches a day after the last fire. This certainly was not possible for us. The bench only warmed after hours of running a fire and was stone cold in the morning. When temps dropped below zero, which it did frequently, we took turns waking up every 1.5 hours to refresh the fire throughout the night (ok, mostly Mike because he's a mensch).
           -this one is up for some debate: one of us thinks there wasn't enough sand in our cob mixture, the other thinks there was too much.
           -not enough of a mass (tiny house is 9'x13', we could only fit a 5'x2'x2.5' bench), maybe the heat was drawn through the small system too quickly to heat the cob
          -tiny house was not "buttoned-up" the way the house will be due to previously mentioned expectations of a mild winter--maybe we were losing heat faster than the rocket stove could replace it.

Conclusion: I could not recommend a rocket mass heater, but I also wouldn't argue against them. I think user error played a role and I believe online rocketeers who say they love theirs. Aside from the functional aspect, I have to say that after the novelty of having built it ourselves-- and it looking vaguely steampunky-- wore off, the aesthetics were not our scene. The industrial look of the barrel, the bulkiness of the bench, and not being able to watch the fire burn are enough to dissuade me from having one in the house.

For the house, I'm keeping my fingers crossed for one of these:

Tuesday, March 18, 2014

Off-grid chicken brooder

Chickens are good to have around a homestead for multiple reasons: eggs, pest control, nitrogen-rich fertilizer, garden bed prepping, and entertainment--chickens are hilarious. The pest control is noticeable. Before we put our little flock of six out I was finding a tick on me about every other day, in the last two weeks I've found three.

the hover doubled as a roost
Conventional chicken brooding practice stipulates the use of a heat lamp to keep chicks at a constant of around 90 degrees. We run a generator during the day to charge my laptop, cell phones, and to run power tools-- when the generator stops so does the electricity. Our inability to run a heat lamp almost kept us from getting chicks this year but I found several sources online suggesting heat lamps are too hot, that's why chicks in the store so often lay themselves out flat on the ground and don't move, they're too hot.

We came up with a two-prong heat solution that worked perfectly for our baby barred rocks. I built a hover (upside down box for chicks to go under to get warm) out of a cardboard box, lined the inside of it with mylar (aluminum foil would probably work as well), and stuck a hot water bottle (can be purchased at most pharmacies or this one on amazon is really heavy-duty and reliable) wrapped in a hand towel under it. The chicks ducked under the hover when they got cold and came back out when they were too warm.

they out-grew this brooder by week three

Pasty butt was not a problem with our barred rocks, not once.

There are two downsides to brooding this way: the hot water bottle needed to be refilled three times a day, more effort than plugging in a heat lamp, and the hand towel got pooped on so it could be a little messy. Even so, I prefer this to dealing with pasty butt and I would bet the heat from the water bottle felt more natural (like a mama hen) and more comfortable for the chicks.

What I've learned from chicken brooding: 1. Chicks are excellent communicators, they let you know in no uncertain terms that they are in need of something, and it's not hard to figure out whether it's food, water, or heat. 2. Chicks are hardier than much of the literature suggests. I had them outside for 30-45 mins a day after their first week home, with outside temperatures of high 30's and low 40's.


I'm not suggesting that my experience with six chicks has made me an expert who can now lay waste to all previous chicken brooding conventions. But, as any generalist knows, sometimes specialized knowledge (the expert way of doing things) can get in the way of intuitive innovation backed up by thoughtful observation.